
The Complete Guide to Logo Sizes for T‑Shirt Printing
Choosing the right logo size for T‑shirt printing is one of the most overlooked yet critical decisions in custom apparel production. Whether you’re printing corporate uniforms, event merchandise, retail streetwear, or promotional giveaways, logo sizing directly affects visual impact, brand perception, print clarity, and even production cost.
In this comprehensive guide, we break down logo sizing specifically within ChromaPrint’s production context — factoring in print methods, garment types, placement standards, and real‑world client use cases in Singapore. All measurements are provided in centimetres (cm) for accuracy and production readiness.
Why Logo Size Matters in T‑Shirt Printing
Logo size is not just an aesthetic choice — it influences functionality, branding effectiveness, and wearer comfort.
Key reasons logo sizing is important:
Brand visibility — Too small and your logo disappears. Too large and it looks overwhelming.
Print clarity — Fine details require sufficient size to reproduce cleanly.
Garment proportion — Adult vs youth sizing changes visual balance.
Printing method constraints — Some techniques have maximum print areas.
Cost implications — Larger prints use more ink, film, or embroidery stitches.
At ChromaPrint, logo sizing consultations are part of every order because improper scaling is one of the top causes of print dissatisfaction.
Standard Logo Placement Areas (With Recommended Sizes)
Below are industry‑tested sizing guidelines adapted to ChromaPrint’s machinery capabilities and garment templates.
1. Left Chest Logo Size
Recommended size:
Width: 7 – 10 cm
Height: Proportional to artwork
The left chest is the most common placement for:
Corporate uniforms
Polo shirts
Event crew tees
Staff apparel
This placement communicates professionalism and subtle branding.
When to go smaller (6 – 7 cm):
Embroidery with fine text
Minimalist retail branding
When to go larger (9 – 10 cm):
Bold logos
Visibility from distance
Print method compatibility:
Embroidery
Silkscreen printing
Heat transfer
3D silicone print
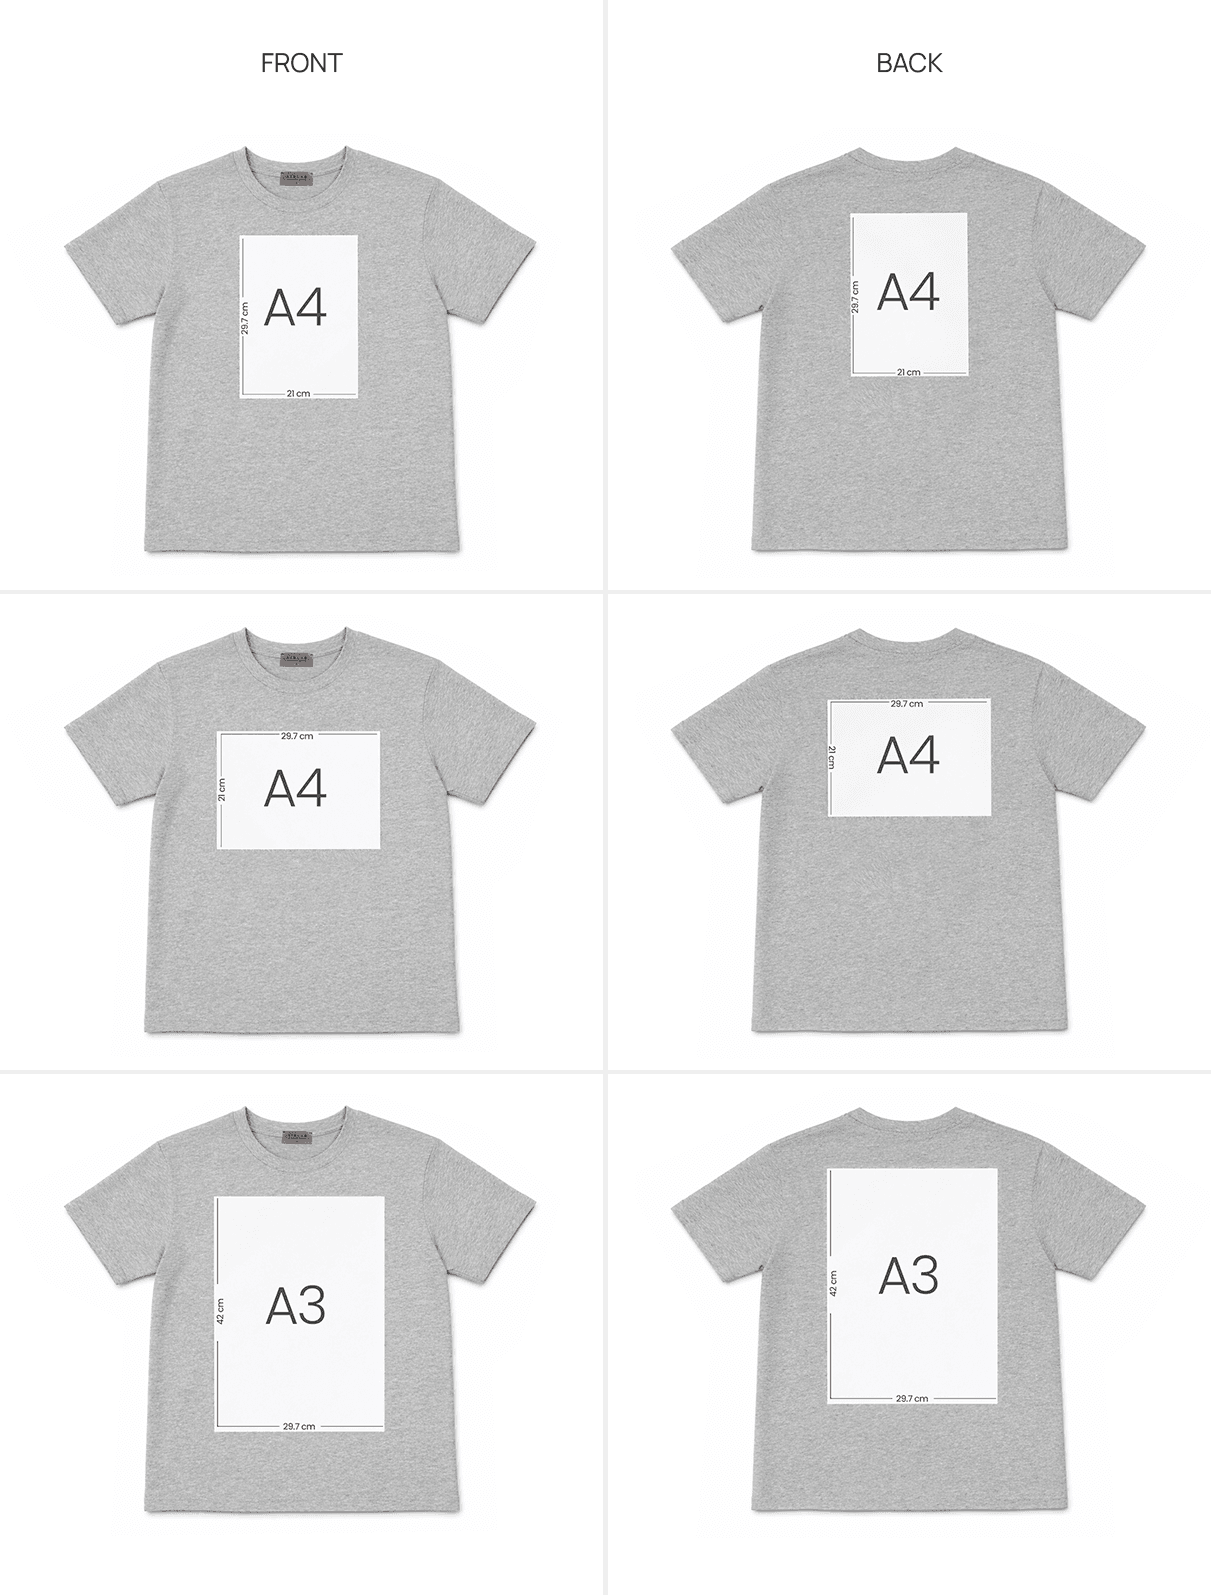
2. Full Front Logo Size
Recommended size:
Width: 20 – 30 cm
Height: Proportional (typically 25 – 35 cm)
This is the most visually dominant placement and is widely used for:
Event T‑shirts
School shirts
Marketing campaigns
Retail merchandise
Sizing considerations:
A3‑equivalent visuals sit around 28 – 30 cm width
Oversized streetwear prints may reach 32 cm (garment permitting)
Best print methods:
Silkscreen printing
DTF heat transfer
Sublimation (polyester garments)
3. Full Back Logo Size
Recommended size:
Width: 25 – 30 cm
Height: Up to 35 cm
Back prints are ideal for high‑visibility branding, especially when staff or participants are moving around.
Common use cases:
Marathon shirts
Construction uniforms
Class tees
Company D&D events
Design tip:
Pair back logos with a smaller left chest logo for balanced branding.
4. Sleeve Logo Size
Recommended size:
Width: 6 – 9 cm
Height: 6 – 9 cm
Sleeve prints are subtle but powerful for brand reinforcement.
Popular sleeve applications:
Sponsor logos
Partner branding
Flag prints
Hashtags or slogans
Sleeve logos work best when combined with chest or back prints.
5. Oversized / Streetwear Logo Size
Recommended size:
Width: 30 – 35 cm
Height: Up to 40 cm
Oversized prints are trending in retail and street fashion.
Best suited for:
Fashion brands
Influencer merchandise
Streetwear drops
Requires:
High‑resolution artwork
Large platen heat presses
Even pressure distribution
Youth vs Adult Logo Scaling
In an ideal scenario, logo sizes would scale proportionately across different garment sizes (kids, youth, adult, plus sizes). However, in real-world bulk production — especially as explained in this What Is Silkscreen Printing article, this is usually not feasible.
Why Logo Sizes Cannot Be Scaled Per Shirt Size
Silkscreen printing uses a fixed printing mould (screen frame) created from a single artwork dimension. Once this screen is produced, the logo prints at the exact same size across all garments in the production run.
Creating multiple scaled versions would require:
Separate artwork resizing
Multiple screen exposures
Additional screen frames
Extra machine setup time
Re-registration for alignment
This significantly increases cost and production complexity.
Because of this, most bulk orders adopt a standardized logo size that works proportionately across the full garment size range.
Production Reality Example
If a left chest logo is set at 8 cm width:
It may look slightly larger on Size S
It may look slightly smaller on Size XXL
But this visual variance is accepted industry-wide to maintain cost efficiency.
Logo Size Guidelines by Print Method
Different printing techniques have different optimal size ranges.
Silkscreen Printing
Best size range: 8 – 30 cm
Advantages:
Sharp edges for bold graphics
Vibrant spot colors
Extremely durable wash performance
Most cost-effective for bulk orders
Limitation: Intricate Detail Reproduction
Silkscreen printing is not ideal for highly intricate artwork.
This includes:
Fine text below 2 mm stroke weight
Complex gradients
Photographic imagery
Ultra-thin lines
Highly detailed logos
Because ink is pushed through mesh screens, very fine details may:
Fill in
Break apart
Lose sharpness
Merge into surrounding colors
For this reason, artwork often needs simplification before silkscreen production.
Embroidery
Best size range: 6 – 10 cm
Advantages:
Premium texture
Durable stitching
Limitations:
Not ideal for large back prints
Fine gradients not possible
Heat Transfer / DTF
Best size range: 8 – 32 cm (Max A3 size)
Advantages:
Excellent for intricate details
Reproducing ultra-fine lines
Supports gradients and shadows
Photographic image printing
No color limitation
Why DTF Is Better for Detailed Logos
Direct-to-Film (DTF) heat transfer prints artwork digitally onto film before transferring it onto garments.
Because it is not mesh-based like silkscreen printing, it can reproduce:
Small typography
Complex illustrations
Multi-color brand marks
Texture effects
High-resolution graphics
This makes DTF the preferred method when logo clarity is critical — especially for retail brands, sponsor logos, and detailed corporate identities.
While DTF may have a slightly higher unit cost than bulk silkscreen printing, it eliminates the need to simplify artwork and preserves full design fidelity.
Sublimation Printing
Best size range: Full coverage
Used for:
Sports jerseys
Polyester tees
Gradient artwork
Allows all‑over prints beyond standard logo sizing.
Distance Visibility vs Logo Size
A practical way to determine logo size is viewing distance.
Viewing Distance | Recommended Logo Width |
|---|---|
1 metre | 6 – 8 cm |
2 metres | 8 – 12 cm |
5 metres | 20 – 30 cm |
For roadshows and exhibitions, larger prints improve brand recall.
Common Client Mistakes in Logo Sizing
At ChromaPrint, we frequently advise clients against these pitfalls:
1. Logos Too Small
Fine text becomes unreadable after printing.
2. Logos Too Large
Prints extend into armpit or collar zones.
3. Ignoring Garment Size Mix
Adult sizing applied to kids shirts.
4. Low Resolution Artwork
Scaling up exposes pixelation.
Maximum Print Area (ChromaPrint Production Specs)
Our standard maximum print zones:
Front/Back silkscreen: 28 × 35 cm
Heat transfer: 28 × 35 cm
Embroidery frame: 12 × 12 cm
Knowing these limits helps designers prepare production‑ready files.
Logo Placement Height Guidelines
Size alone isn’t enough — placement height matters.
Left chest placement:
7 – 10 cm below collar
8 – 12 cm from centreline
Full front placement:
Top of print 8 – 12 cm below collar
Correct positioning ensures logos sit naturally on the body.
Special Logo Applications
Pocket Logos
Recommended width: 5 – 7 cm
Used for minimalist branding.
Vertical Logos
Recommended height: 18 – 25 cm
Popular for:
Sleeve length prints
Side torso branding
Back Collar Logos
Recommended width: 6 – 8 cm
Often used by retail brands for subtle identity.
Fabric Type Impact on Logo Size
Fabric affects how logos appear visually.
Cotton:
Absorbs ink
Slight spread
Dri‑fit polyester:
Holds sharp edges
Suitable for detailed prints
Heavyweight cotton:
Supports embroidery well
Larger logos often appear sharper on smoother fabrics.
Logo Size for Different Apparel Types
Polo Shirts
Chest: 7 – 9 cm
Sleeve: 6 – 8 cm
Professional corporate standard.
Hoodies & Jackets
Chest: 8 – 12 cm
Back: 25 – 30 cm
Thicker fabrics support larger embroidery.
Jerseys
Front sponsor: 20 – 28 cm
Back name set: 25 – 30 cm
Requires sublimation or heat transfer.
Artwork File Setup Based on Logo Size
Designers should prepare files at actual print dimensions.
Recommended export specs:
300 DPI
Transparent background
Vector AI / PDF preferred
Scaling low‑resolution files to 25 – 30 cm often causes blur.
Cost Impact of Logo Size
Larger prints cost more due to:
Ink coverage
Film usage
Machine time
Embroidery stitch count
Example:
8 cm embroidery ≈ 4,000 stitches
10 cm embroidery ≈ 7,000+ stitches
Scaling up significantly increases cost.
When to Break the Rules
Some branding strategies intentionally deviate:
Micro logos for luxury fashion
Jumbo prints for hype streetwear
Off‑centre placements for design aesthetics
ChromaPrint supports custom placements with mockup previews before production.
Mockup & Sampling Process
Before mass production, we recommend:
Digital mockup scaling
Print test on sample tee
Wearability review
This eliminates guesswork on logo sizing.
Quick Reference Logo Size Chart
Placement | Recommended Width |
|---|---|
Left Chest | 7 – 10 cm |
Full Front | 20 – 30 cm |
Full Back | 25 – 30 cm |
Sleeve | 6 – 9 cm |
Collar | 6 – 8 cm |
Oversized | 30 – 35 cm |
Final Recommendations from ChromaPrint
Prioritize readability over design proportion
Scale logos to garment size mix
Match print method to artwork complexity
Test via mockups before bulk production
Logo sizing is both a science and an art — balancing aesthetics, branding, and production feasibility.
If you’re unsure what size works best, ChromaPrint’s consultants provide complimentary artwork scaling and mockups to ensure your printed apparel looks production‑perfect.
Need help with logo sizing?
Reach out to ChromaPrint for professional guidance on artwork setup, placement optimization, and print method selection.